VLC media player offers everything that you would need to play your video files. It comes with tonnes of customization options. However, recently while playing a movie on a VLC media player, I could not hear the audio. The video was playing fine but without any sound or audio. The first thing I did was check my Volume level, and it was fine. Restarted the PC, but the problem did not resolve. Just to make sure that my speakers are working fine, I logged into YouTube and played a video that worked perfectly fine with the audio. So, the problem was with the VLC media player or the settings. So, today in this post, I will be listing the best ways to fix VLC Media Player audio issues.
Fix VLC Playing Video without Audio
Things you should do before following any of the methods given below.
Restart your PC: Now this is the most common suggestion anyone would provide. At times, the problems could be temporary, and a quick restart might fix the issue.
Play a video Online: Make sure your speakers or the headphone is working fine by playing a video on YouTube in case you cannot hear the audio on even the default Windows media player.
Related Articles:
Fix 1: Enable / Unmute Audio in VLC Media Player
This has to be the first thing that you should check in case the audio is not playing in VLC Media Player. You might have accidentally muted the VLC Media Player audio and now facing the issue.
Open VLC Media Player, go to Audio.
At the end of the option, click on Mute. Now, look at the bottom right of the VLC media player. If the volume indicator is in Green, then you have unmuted the Audio. If it is in Grey, you have muted the Audio. The same Mute option works for both muting and unmuting the Audio in VLC Media Player.
Enable Audio: You may also want to check if the audio is enabled or disabled in VLC Media Player.
Go to Tools and select Preferences.
Click and open the Audio tab.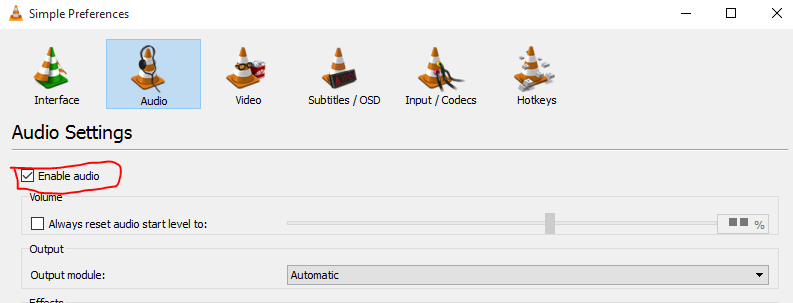
Check the Enable Audio option if it is unchecked. Click on Save to save the settings. Close VLC Media Player and open it again.
Fix 2: Change Audio Device in VLC Media Player
The VLC media player has an audio device option which allows you to select your preferred audio devices such as speakers or the headphones for listening to the audio. However, when you install VLC Media Player, it sets the audio device to default which can create audio that is not playing problem. To fix VLC playing video without an audio problem, you have to change the audio device from the settings.
Open VLC and click on Audio.
Go to Audio Device. Here the Audio Device should be already set to Default. You have to change it to Independent RTC Headphones or Speakers / Headphones. If you are using a Headphone, then select Independent RTC Headphones.
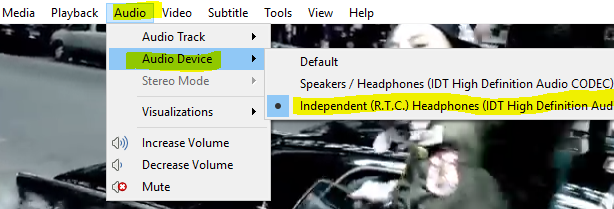
Note: If you have different options from the one mentioned above, then try them instead and see if that resolved the issue.
Now play the video which had the problem and you should be able to listen to the audio.
Fix 3: Reset VLC Media Player Preferences
Another easy solution to fix the audio is not playing an issue in VLC Media Player is to reset preferences in the app. Doing so, you will reset the app’s preference settings and restoring it back to the default settings.
To do this, open VLC Media Player and click on Tools.
At the bottom, click and open Preferences.
Under Preferences, scroll down and at the bottom left click on Reset Preferences.
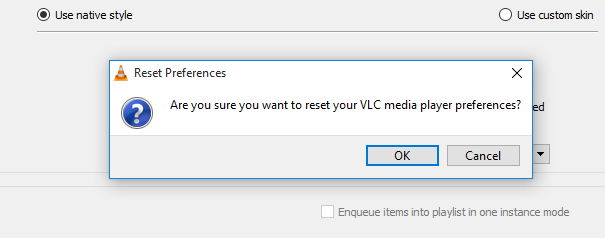
A pop-up notification will appear asking you to confirm the VLC Media Player reset preferences option. Click OK to proceed. If necessary follow fix 1 again to resolve the issue.
Fix 4: Enable Sound Devices
You may also face problems with Audio in VLC Media Player or any other Media Players in your PC if the sound devices are disabled in Sound Settings. To fix this, do the following.
Related Articles:
Open Control Panel and open Hardware and Sound.
Click and open Sound. It will open the Sound dialogue box.
In the Playback tab, you should see all the audio devices listed.
Right-click on all the Audio Devices and select Enable.
If you don’t find any audio devices, right-click on an empty area and select Show Disabled Devices.
Click on Apply and OK to save the settings.
Now restart your PC and you may have your PC playing Audio again.
Fix 5: Change VLC Media Player Audio Output Module
Changing the Audio output module are some advanced audio settings that you may not have to use ever. However, if you are unable to resolve the audio is not playing problem in VLC media player. To do this, do the following.
Open VLC Media Player, click on Tools and select Preferences.
Under Simple Preferences, click the Audio tab.
In the Output section, click the drop-down menu beside the Output Module and select WaveOut Audio output.
Below that, click on the drop-down menu beside Device and select Speakers / Headphones.
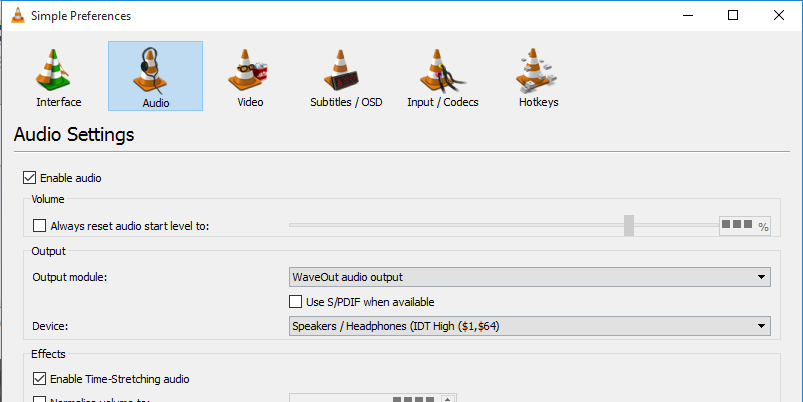
Click on Save to save the settings. Close VLC Media Player and restart it.
Fix 6: Enable/Disable S/PDIF
There is one more option in the VLC Media Player that can cause the Audio is not playing problem. You can try enabling or disabling the S/PDIF option in VLC Media Player to resolve the Audio issue.
Open VLC Media Player, click on Tools and select Preferences.
Under Simple Preferences, click the Audio Tab.
In the Audio settings, go to the Output section and click the drop-down menu. Select WaveOut Audio Output.
Below that, check Use S/PDIF when Available. If already checked, uncheck Use S/PDIF when Available.
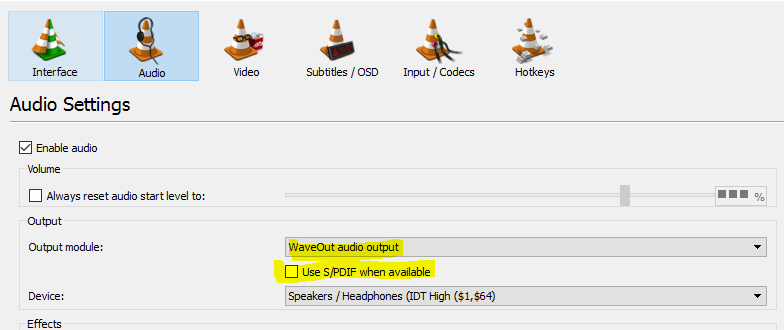
Click on Save to save the settings. Close and restart VLC Media Player starts playing the video to see if the audio issue has been resolved.
Related Articles:
Fix 7: Check Volume Mixer Settings
Open VLC Media Player and play the video. Minimize the VLC Media Player window.
Now from the desktop, right-click on Volume icon ( bottom right) in the Taskbar and select Open Volume Mixer.
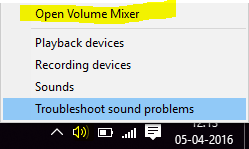
Select any Audio Device and in the Application section, increase the volume for VLC Media Player.
Close the Volume Mixer and see if the audio problem has been resolved.
Fix 8: Disable and Enable Audio Track in VLC Media Player
Open VLC Media Player and play the video. While the video is playing, click on Audio >> Audio Track and select disable.
Again go to Audio >> Audio Track and select Enable. This may help you resolve the audio problem in the VLC media player.

Fix 9: Troubleshoot Sound Problems
If nothing seems working, you may try to troubleshoot sound problems. Right-click the Volume icon in the taskbar at the right-side bottom and select Troubleshoot sound problems.
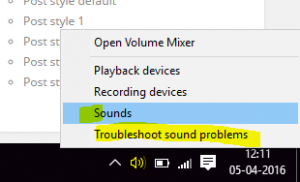
Wait till the Troubleshooter detects the problem.
Next, select the audio device for which you want to check for audio problems. Click Next to proceed.
Wait until the troubleshooter detects and recommends any solution to fix the audio issue.

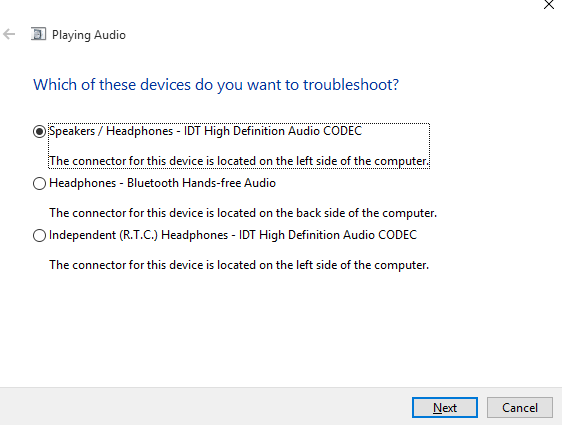


Thanks a lot….
It worked for me when I was in need….
Glad I Could help buddy. Cheers 🙂
Is this steps working in windows 10 after installing corel draw x3? Cause i’Ve already incounter Vlc Midea player audo problem after installing corel draw x3.
I am not sure If installing Corel Draw X3 has anything to do with the audio issue. Do try them and see if it works.
Thank you so much! This was the only (and perfect) help I found online.
I am a Mac user. I tried some of the above but it did not seem to work. Then I went to VLC–preferences —audio —reset all. That solved the problem for me.