If you have recently upgraded to Windows 10, you may face WiFi connectivity error. Even though you are connected to the WiFi hotspot, you are unable to access the internet. The error shows ” No Internet, secured” in Windows 10.
However, do note that this error is not limited to the users who have upgraded to Windows 10 recently. This can also occur even if you are using Windows 10 for a long time.
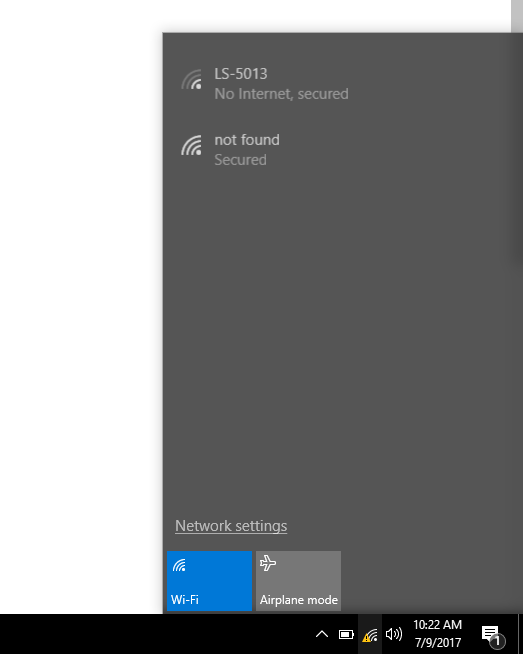
So, today in this article, I will show you how to fix ” No Internet, Secured” WiFi connection error in Windows 10.
Fix 1: Restart WiFi Hotspot or Router
The first thing you should try when you see a “no internet, secured error” is to restart your WiFi hotspot or the router.
If you are using a mobile device or portable WiFi hotspot then simply turn off WiFi hotspot (tethering) and then restart it.
Do the same if you are using a WiFi router. Disconnect the ethernet cable, turn off the Router and then restart it.
Once restarted, try to connect to the WiFi network and see if the “No internet, Secured” error is resolved.
Fix 2: Change WiFi Bandwidth to 20MHz Only
Some users have reported that after changing the Bandwidth in the WiFi adapter settings to 20MHz from 20_40MHz has fixed the issue. Here is how to do it.
Go to “Control Panel” and open “Network and Internet”.
Next, click “Network and Sharing Center”.
Related Articles:
-
How to Change Language from Hindi to English in Google Chrome
-
Fix DNS_PROBE_FINISHED_NXDOMAIN Error in Google Chrome
From the left side click “Change Adapter Settings“.
Now right-click on WiFi adapter and select “Properties”.
Click “Configure” and select the “Advanced” tab.
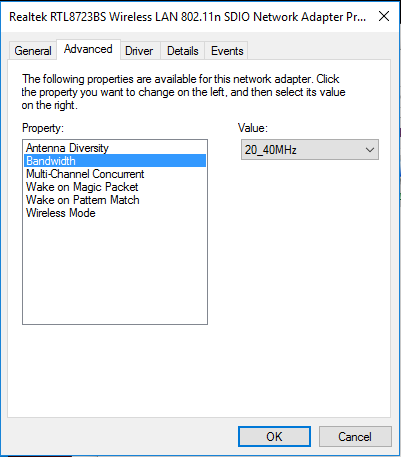
Now click “Bandwidth” and from the drop-down menu select “20 MHz only“. The value of Bandwidth should be 20_40MHz by default.
Click OK and save the changes.
Note: If you don’t find Bandwidth option then look for “HT Mode” or “Bandwidth Compatability” etc. and save the changes.
For HT Mode, select value to HT Mode 20|40 and save the changes.
Once done, restart your PC and see if you can connect to the internet and if the “No internet, secured” error is resolved.
Note 2: If necessary, follow the fix 1 again.
Fix 3: Uninstall and Reinstall WiFi Adapter Drivers
The next fix is to check if the “no internet, Secured” error is because of the WiFi Adapter drivers on your PC. Here is how to do it.
In the Cortana/Search bar, type “Device Manager“. Click Device Manager to open it.
In the Device Manager window, expand “Network Adapters“.
Now right-click on your WiFi Adapter Driver and select Uninstall.
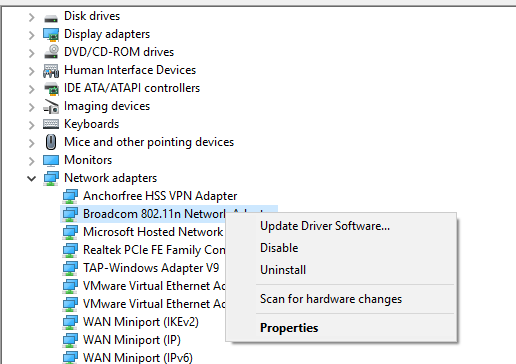
Once successfully uninstalled, it is time to reinstall it. Right-click on the Network Adapter and select “Scan for hardware changes“.

The Windows will now scan for the hardware changes and will reinstall the driver for WiFi Adapter.
Now restart your PC. After the restart, try to connect to the WiFi network and see if the “No internet, Secured” problem is resolved.
Note: If necessary, follow step 1 again and try to connect to the WiFi network.
Fix 4: Changes DNS Settings in IPV4
The possibility is that your Network Adapter DNS settings might be set to obtain IP Address and DNS Server Address manually. This can cause the “No internet, secured” WiFi connectivity error in Windows 10.
To fix this, we can set the IP address and DNS server address obtaining tasks to automatic. Here is how to do it.
Go to “Control Panel” and click “Network and Internet”.
Next, click “Network and Sharing Center” and select “Change Adapter Settings“.
Right-click on “WiFi Network” and select “Properties”.
Now double-click on “Internet Protocol Version 4 (TCP/IPv4)“.
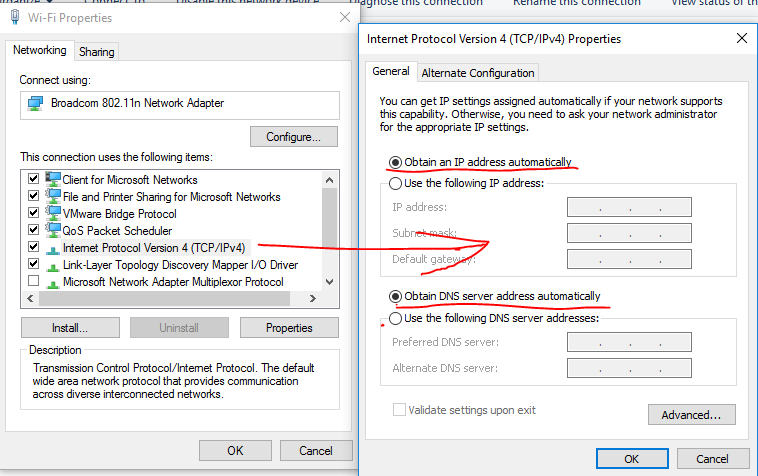
Now select “Obtain IP Address Automatically” and “Obtain DNS Server Address automatically” and click OK to save the changes.
Related Articles:
Once the changes are saved, try to connect to the WiFi network and see if the error is resolved.
Fix 5: Check your Firewall Settings
If nothing seems working, the problem could be because of the Firewall settings of your PC. If you are using a third-party Firewall, then check your Anti-Virus settings. If you are using Windows Defender Firewall, try this.
Type “Firewall” in the Search/Cortana bar and select “Windows Firewall“.
From the left side click “Turn Windows Firewall On or Off“.
Next, turn off Windows Firewall for both “Private Network Settings” and “Public Network Settings“.
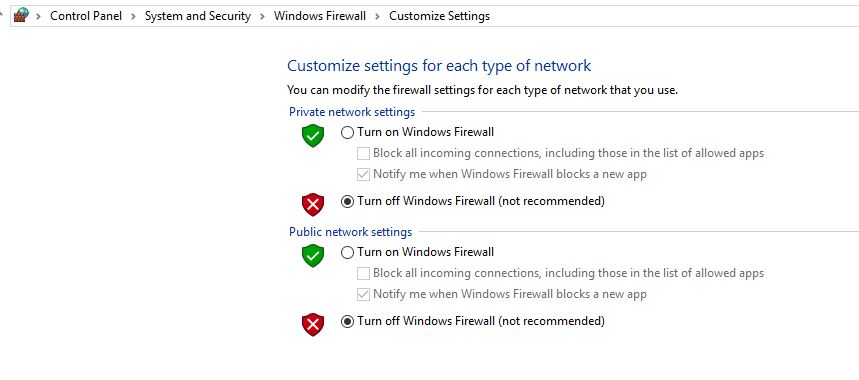
Click OK to save the changes and restart your PC. After the restart see if the error is resolved.
